Olav Grønås Gjerde

profile image
Full stack system architect with passion for Unix, Java, Python and databases.
Twitter @olavgg
1 year ago

How to use Spring Boot JPA CriteriaBuilder and PostgreSQL ILIKE operator

First create a Postgres Function

-- This function is for working around the lack of support for ILIKE operator in Hibernate
CREATE OR REPLACE FUNCTION ILIKE_FN(name text, name_arg text) RETURNS bool
    LANGUAGE SQL
RETURN name ILIKE name_arg;

Then do the following in your CriteriaBuilder

CriteriaBuilder cb = entityManager.getCriteriaBuilder();
CriteriaQuery<Person> q = cb.createQuery(Person.class);
Root<Person> root = q.from(Person.class);
root.fetch("metadata", JoinType.LEFT);

List<Predicate> predicates = new ArrayList<>();
if(personFilter.getName() != null){
    // We have created a function named ILIKE_FN in psql that can handle the
    // ILIKE operator that hibernate doesn't support
    Expression<Boolean> ilikeExp = cb.function(
            "ILIKE_FN",
            Boolean.class,
            root.get("name"),
            cb.literal(personFilter.getName().toUpperCase())
    );
    predicates.add(cb.isTrue(ilikeExp));
}
if(personFilter.getId() != null){
    predicates.add(cb.equal(root.get("id"), personFilter.getId()));
}

q.where(predicates.toArray(new Predicate[0]));

TypedQuery<Person> query = entityManager.createQuery(q);
List<Person> persons = query.getResultList();

And you will get the following SQL generated:

select
        a1_0.id,
        a1_0.description,
        a1_0.name,
        m1_0.id,
        m1_0.key,
        m1_0.value,
    from
        person a1_0 
    left join
        person_metadata m1_0 
            on a1_0.id=m1_0.person_id 
    where
        ILIKE_FN(a1_0.name,'OLAV GJERDE')
1 year ago

How to Configure pgAdmin 4 with OAuth2 and Keycloak

I have earlier mentioned how to install pgAdmin on Linux and FreeBSD. Now we will enable OAuth2 authentication for Single Sign on support. Keycloak is a fantastic open source product for managing users. It is open source and there is plenty of great documentation and youtube videos about it.

This is not a tutorial about KeyCloak

Anyway we need to configure Keycloak. I assume you have already created a realm with users. If not read and do that first.

I am not going to cover the GUI, as GUI's change and layouts change. It only adds more confusing as this tutorial ages. We will use the REST Api instead.

First login with your keycloak admin user

bin/kcadm.sh config credentials --server http://mykeycloak:8080 --realm master --user admin --password secret

Generate a client secret

export CLIENT_SECRET=`tr -dc A-Za-z0-9 </dev/urandom | head -c 24 ; echo ''`

Create the client

bin/kcadm.sh create clients -r my-realm-name  -f - << EOF
        {
          "clientId": "pgadmin",
          "baseUrl": "/",
          "surrogateAuthRequired": false,
          "enabled": true,
          "alwaysDisplayInConsole": false,
          "clientAuthenticatorType": "client-secret",
          "secret": "${CLIENT_SECRET}",
          "redirectUris": [
            "https://my_pgadmin_server/oauth2/authorize"
          ],
          "webOrigins": ["+"],
          "bearerOnly": false,
          "consentRequired": false,
          "standardFlowEnabled": true,
          "implicitFlowEnabled": false,
          "directAccessGrantsEnabled": false,
          "serviceAccountsEnabled": true,
          "publicClient": false,
          "frontchannelLogout": false,
          "protocol": "openid-connect",
          "defaultClientScopes": ["web-origins","role_list","roles","profile","email"],
          "optionalClientScopes": ["address","phone","offline_access","microprofile-jwt"],
          "name" : "pgAdmin Client"
        }
      EOF

That's basically all you need todo with Keycloak.

Next step is configuring pgAdmin, edit following file /var/lib/pgadmin/.local/lib/python3.9/site-packages/pgadmin4/config_local.py Note: your install location of pgadmin may vary

SERVER_MODE = True
MASTER_PASSWORD_REQUIRED = True
AUTHENTICATION_SOURCES = ['oauth2', 'internal']
OAUTH2_AUTO_CREATE_USER = True
OAUTH2_CONFIG = [{
    'OAUTH2_NAME': 'MyKeyCloak',
    'OAUTH2_DISPLAY_NAME': 'MyKeyCloak',
    'OAUTH2_CLIENT_ID': 'pgadmin',
    'OAUTH2_CLIENT_SECRET': 'your-client-secret-here',
    'OAUTH2_TOKEN_URL': 'https://mykeycloak/realms/datahub/protocol/openid-connect/token',
    'OAUTH2_AUTHORIZATION_URL': 'https://mykeycloak/realms/datahub/protocol/openid-connect/auth',
    'OAUTH2_API_BASE_URL': 'https://mykeycloak/realms/datahub/',
    'OAUTH2_USERINFO_ENDPOINT': 'https://mykeycloak/realms/datahub/protocol/openid-connect/userinfo',
    'OAUTH2_SCOPE': 'openid email profile',
    'OAUTH2_BUTTON_COLOR': '#51c65b;',
    'OAUTH2_SERVER_METADATA_URL': 'https://mykeycloak/realms/datahub/.well-known/openid-configuration'
}]

Restart pgAdmin and test your login.

1 year ago

Delayed start for service in systemd on Debian

I had an issue when I configured SR-IOV on Mellanox NIC where libvirt would start before the network was ready.

The fix for this is to enable 2 services

sudo systemctl enable systemd-networkd.service systemd-networkd-wait-online.service

Then edit the libvirt systemd file: /usr/lib/systemd/system/libvirtd.service and add:

After=systemd-networkd-wait-online.service
Wants=systemd-networkd-wait-online.service

Now libvirt will start when the network is ready and when all the virtual functions are ready.

1 year ago

KVM Debian 12 bookworm - virsh start VM with error message: failed to open /dev/vfio/62 Permission denied

So I was playing around with SR-IOV and adding a network pool with virtual functions for my virtual machines. Unfortunately I got stuck with and error message when I tried to start my virtual machine.

failed to open /dev/vfio/62 Permission denied

Then it is most likely AppArmor denying libvirt access to /dev/vfio

You can fix this by editing /etc/apparmor.d/local/abstractions/libvirt-qemu Add:

/dev/vfio/* rw,

And restart your VM for success:

2 years ago

Micronaut Test and Flyway. How to clean database for each run.

I had a case where I needed to clean the database when running tests with Micronaut. This is a simple configuration. Just add clean_schema to your application-test.yml

Example:

jpa:
  default:
    properties:
      hibernate:
        show_sql: true
        format_sql: true
datasources:
  default:
    driver-class-name: org.postgresql.Driver
    db-type: postgres
    schema-generate: NONE
    dialect: POSTGRES
    url: jdbc:postgresql://localhost:5432/my_example_test
    username: example_test
    password: example_pw
flyway:
  datasources:
    default:
      enabled: true
      clean-schema: true
3 years ago

Secure cookie flag for Grails 3

Add this to your application.yml

server:
    servlet:
        session:
            cookie:
                domain: olavgg.com
                http-only: true
                path: /
                secure: true

This should work with Grails 4+ and I have verified that it works with Grails 5

For older Spring versions and Grails 3 this was

server:
    session:
        cookie:
            domain: adminpanel-test-boost.ai
            http-only: true
            path: /
            secure: true
3 years ago

Native hibernate query in Grails

Here is a simple example of how to do a native database query with Hibernate

@Service(Sensor)
abstract class SensorService implements ISensorService {

    SessionFactory sessionFactory

    Sensor findByTag(String tag){
        Session session = sessionFactory.currentSession
        String sql = """
                "select * from sensor where tag = :tag
        """
        Query query = session.createNativeQuery(sql, Sensor)
        query.setParameter("tag", tag)
        return query.getSingleResult()
    }

}
4 years ago

Upgrade pgAdmin4 to a new version

If you followed my earlier blog How to install and configure pgAdmin4 for FreeBSD and with uWSGI you will see it was written for version 4.6 of pgAdmin4.

Upgrading pgAdmin4 isn't difficult, on fact you only need todo 3 steps to complete the upgrade:

First step, activate the virtual environment

$ source /opt/pgadmin/pgadm_env/bin/activate

Second step, upgrade pgAdmin4

(pgadm_env)$ sudo pip install https://ftp.postgresql.org/pub/pgadmin/pgadmin4/v4.8/pip/pgadmin4-4.8-py2.py3-none-any.whl

Third and last step, restart uwsgi

$ sudo service uwsgi restart

That's it, super simple!

4 years ago

How to set Grails or Spring Boot JSESSIONID Cookie SameSite Strict

Firefox recently displayed a warning that cookies without samesite attribute would stop working soon.

This can be done by creating a new bean ->

    import org.apache.tomcat.util.http.Rfc6265CookieProcessor;
    import org.springframework.boot.web.embedded.tomcat.TomcatServletWebServerFactory;
    import org.springframework.boot.web.servlet.server.ServletWebServerFactory;

    @Bean
    ServletWebServerFactory servletContainer() {
        return new TomcatServletWebServerFactory() {
            @Override
            protected void postProcessContext(Context context) {
                Rfc6265CookieProcessor rfc6265Processor = new Rfc6265CookieProcessor();
                rfc6265Processor.setSameSiteCookies("Strict");
                context.setCookieProcessor(rfc6265Processor);
            }
        };
    }

For those of you who are new to beans in Grails, you can just copy this method into the default Application class in Grails. This example was done with Grails 4. If you use an older version where this is unsupported, you can also modify set cookie header with either Apache or Nginx.

5 years ago

Grails GORM Criteria with sub query for has many collection

Today I solved something that I had to write about.

I have list of excursions, that can be added to a incident event. So one incident can have multiple excursions. As these excursions are being connected to incidents we only want to display excursions that is not yet connected to a incident.

So how to write this with using Grails Criteria?


List<Excursion> excursions = Excursion.withCriteria {
            
    sensor{
        eq("assetProject", assetProject)
    }
                        
    between("startDateTime", a, b)
    eq("isSuppressed", false)

    if( showOnlyExcursionsNotInIncident ){
                
        // The trick here is the subquery builder
        DetachedCriteria subQuery = DetachedCriteria.forClass(Incident, 'i')
            .with {
                createAlias("i.excursions", "e2")
                setProjection Projections.property('e2.id')
                add Restrictions.conjunction()
                    .add(
                        Restrictions.eqProperty(
                            'e2.id',
                            'this.id'
                        )
                   )
            }
                        
        add Subqueries.notExists(subQuery)
    }
        
    order "startDateTime", "desc"
}

Which will generate the following SQL

select
        ....
    from
        excursion this_ 
    inner join
        sensor sensor_ali1_ 
            on this_.sensor_id=sensor_ali1_.id 
    where
        (
            sensor_ali1_.asset_project_id=?
        ) 
        and this_.start_date_time between ? and ? 
        and this_.is_suppressed=? 
        and not exists (
            select
                ee2x1_.id as y0_ 
            from
                incident i_ 
            inner join
                incident_excursion excursione3_ 
                    on i_.id=excursione3_.incident_excursion_id 
            inner join
                excursion ee2x1_ 
                    on excursione3_.excursion_id=ee2x1_.id 
            where
                (
                    ee2x1_.id=this_.id
                )
        ) 
    order by
        this_.start_date_time desc

Learning to do this stuff with criterias is awesome, as it is much easier to do custom filtering with criterias than using raw SQL. It can also be easier to read.

5 years ago

Grails GORM HQL Eager fetch

Sometimes you want to select associated objects using a single select query. Also called eager fetching.

Todo this with HQL in Grails is a simple as:

List<Sensor> sensors = Sensor.findAll("FROM Sensor s INNER JOIN FETCH s.equipmentType")
5 years ago

Lighter select queries with Grails Criteria and DTO's

If you have a huge domain class like this:

class Sensor {

    Long id
    SensorType sensorType
    String parentTag
    String parentTagDescription
    EquipmentType equipmentType
    String runningSignalTimeserieName
    Boolean isPumpActive
    AssetProject assetProject
    SensorUnit unit
    Segment segment
    String segmentDescription
    String tag
    String description
    String deactivatedDescription
    String note
    String pAndID
    Float lValue
    Float llValue
    Float lllValue
    Float hValue
    Float hhValue
    Float hhhValue
    SensorStatus status
    Boolean deactivated = false
    LocalDateTime dateCreated
    LocalDateTime lastUpdated
    Person createdBy
    Person lastUpdatedBy
    SensorPumpGroup sensorPumpGroup
    String flowTimeserieName
    String flowTemperatureTimeserieName
    String flowPressureTimeserieName
    Double pipeArea
    Double flowDensity
    String flowDescription
    String velocityTimeserieName
    Long lastTimestampForVelocityTimeserie

}

You will always select all fields for your queries if you do not use do not use DTO's (Data Transfer Object). GORM has excellent support for DTO's with its data services. But its not mentioned in the documentation for how you can use DTO's with criterias.

Luckily it is really easy, first create a simple POJO/POGO

class SensorTag {
    long id
    String tag
}

Then write the criteria as this:

List<SensorTag> sensors = Sensor.withCriteria {
    resultTransformer(Transformers.aliasToBean(SensorTag))
    projections {
        property("id", "id")
        property("tag", "tag")
    }
    eq('deactivated', false)
} as List<SensorTag>
5 years ago

Java NIO file descriptor leak issue with Files.list() method

This blog you're reading, is built on Micronaut. And each blog post is stored as a plain text file instead of a database. I just wanted something simple, where I could also easily SSH into the server for modifying and adding new content. However I recently stubled upon a file descriptor leak. I just couldn't figure out how, as everything was wrapped in Java's try with resource.

Anyway using lsof

sudo lsof +D /opt/olavblog

I could see all files that had a file descriptor, and I could see many duplicates. This was because something wasn't properly closed.

Finding the bug ment that I had to use the step by step debugger and check what happened one line after another. In the end I found the faulty line in my code:

Stream<Path> files = Files.list(folderPath)

There is a note in the method documentation mentioning this

@apiNote

 * This method must be used within a try-with-resources statement or similar
 * control structure to ensure that the stream's open directory is closed
 * promptly after the stream's operations have completed.

So the right thing todo is to wrap this in a try with resources statement

try(Stream<Path> files = Files.list(folderPath)){
    files.forEach(filePath -> {
         .......
    });
}
5 years ago

Restart IPMI BMC LOM, without power reset.

Once in a while IPMI/BMC/LOM may freeze and the only way to get it back is to pull the power cord. This will interrupt running services. If you are lucky though, you can use ipmitool to reset your BMC

ipmitool mc reset cold
5 years ago

Install and configure pgAdmin4 for FreeBSD with UWSGI and Nginx

This guide will help you install pgAdmin4 on your FreeBSD machine. What is pgAdmin? It is a free open source graphical management tool for PostgreSQL and derivative relational databases such as EnterpriseDB's EDB Advanced Server. It has a powerful query tool with colour syntax highlighting and graphical query plan display. For people that is not familiar with the Linux shell and the psql client, pgAdmin4 is an excellent tool for interacting with PostgreSQL.
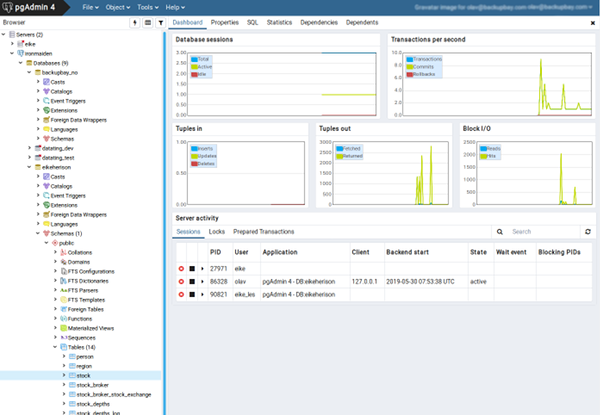
(Screenshot of pgAdmin4)

FreeBSD Setup

Update ports

$ sudo portsnap fetch && portsnap extract

Install necessary packages (you can omit BATCH if you want to configure installations)

$ sudo make -C /usr/ports/lang/python36 install clean BATCH=yes
$ sudo make -C /usr/ports/devel/py-setuptools install clean FLAVOR=py36 BATCH=yes
$ sudo make -C /usr/ports/devel/py-virtualenv install clean FLAVOR=py36 BATCH=yes
$ sudo make -C /usr/ports/databases/py-sqlite3 install clean FLAVOR=py36 BATCH=yes
$ sudo make -C /usr/ports/databases/py-psycopg2 install clean FLAVOR=py36 BATCH=yes
$ sudo make -C /usr/ports/www/uwsgi install clean BATCH=yes

We use Python 3.6 as that is currently working with pgAdmin4 version 4.6.

Setup Python Environment

Create pgadmin app folder and data folder

$ sudo mkdir -p /opt/pgadmin/data

Create virtual python environment

$ sudo virtualenv --python=/usr/local/bin/python3.6 /opt/pgadmin/pgadm_env

Activate virtual env (make sure you are using bash, not sh)

$ source /opt/pgadmin/pgadm_env/bin/activate

Install and configure pgAdmin4

Check the latest release of pgAdmin4 here https://ftp.postgresql.org/pub/pgadmin/pgadmin4/

(pgadm_env)$ sudo pip install https://ftp.postgresql.org/pub/pgadmin/pgadmin4/v4.6/pip/pgadmin4-4.6-py2.py3-none-any.whl

We also need a local uwsgi binary

(pgadm_env)$ sudo pip install uwsgi

Create local pgadmin config file

$ sudo vim /opt/pgadmin/pgadm_env/lib/python3.6/site-packages/pgadmin4/config_local.py

Add following content to config_local.py

import os
DATA_DIR = os.path.realpath(os.path.expanduser(u'/opt/pgadmin/data'))
LOG_FILE = os.path.join(DATA_DIR, 'pgadmin4.log')
SQLITE_PATH = os.path.join(DATA_DIR, 'pgadmin4.db')
SESSION_DB_PATH = os.path.join(DATA_DIR, 'sessions')
STORAGE_DIR = os.path.join(DATA_DIR, 'storage')

Create PGAdmin superuser

(pgadm_env)$ sudo python /opt/pgadmin/pgadm_env/lib/python3.6/site-packages/pgadmin4/setup.py
NOTE: Configuring authentication for SERVER mode.

Enter the email address and password to use for the initial pgAdmin user account:

Email address: myemail@example.org
Password: 
Retype password:
pgAdmin 4 - Application Initialisation
======================================

Create pgadmin user

$ sudo pw useradd pgadmin

Make user pgadmin the owner of the pgadmin installation

$ sudo chown -R pgadmin:pgadmin /opt/pgadmin

Configure UWSGI

This is the most annoying and probably hardest part. Hopefully this guide will help you through this.

First we want to use UWSGI Emperor mode, it makes it possible for us to to host multiple python applications through UWSGI. Even with different python version.

Create Vassals folder for UWSGI

$ sudo mkdir -p /usr/local/etc/uwsgi/vassals

Create pgadmin4.ini

$ sudo vim /usr/local/etc/uwsgi/vassals/pgadmin4.ini
[uwsgi]
uid = pgadmin
gid = pgadmin
socket = /tmp/pgadmin4.sock
chmod-socket = 666
logto = /var/log/uwsgi.log
chdir = /opt/pgadmin/pgadm_env/lib/python3.6/site-packages/pgadmin4
wsgi-file = pgAdmin4.wsgi
virtualenv = /opt/pgadmin/pgadm_env
unprivileged-binary-patch = /opt/pgadmin/pgadm_env/bin/uwsgi
threads = 10

Edit /etc/rc.conf

uwsgi_enable="YES"
uwsgi_flags="--emperor /usr/local/etc/uwsgi/vassals"

Now you can start UWSGI

$ sudo service uwsgi start

You still need to configure Nginx though

Configure Nginx

Create a new virtual host file for nginx that looks like tihs


upstream pgadmin_upstream {
  server unix:/tmp/pgadmin4.sock;
}

server {
      listen 80;
      server_name pgadmin.example.org;
      access_log off;
      error_log off;
      ## redirect http to https ##
      return 301 https://$server_name$request_uri;
}

# HTTPS server
server {
  listen 443 ssl http2;
  server_name pgadmin.example.org;

  ssl_certificate      /path/to/my/ssl/server.crt;
  ssl_certificate_key   /path/to/my/ssl//server.key;
  ssl_session_timeout  5m;

  error_page   500 502 503 504  /50x.html;
    # Only allow local network
  allow 192.168.1.0/24; 
  deny all;
  
  ssl_protocols TLSv1 TLSv1.1 TLSv1.2;
  ssl_ciphers EECDH AES128:RSA AES128:EECDH AES256:RSA AES256:EECDH 3DES:RSA 3DES:EECDH RC4:RSA RC4:!MD5;
  ssl_prefer_server_ciphers on; 

  location / {
    uwsgi_pass pgadmin_upstream;
    include uwsgi_params;
    uwsgi_modifier1 30;
  }
}
6 years ago

Default Sequence Generator Strategy for Grails 3 and Grails 4

When using PostgreSQL together with Grails, one thing that has annoyed me when creating domain classes is that I have to manually add a line for telling hibernate how it should create, name and use the sequences.

Finally Hibernate now has a new SequenceStyleGenerator this solves this:

Create your application.groovy file, application.yml will not work and write this:

grails.gorm.default.mapping = {
    id (
            generator: 'org.hibernate.id.enhanced.SequenceStyleGenerator',
            params: [prefer_sequence_per_entity: true]
    )
}
9 years ago

Home/Small Office Quiet 10Gbps Switch with FreeBSD 10.2-RELEASE

Today you can get 10Gbps network cards for less than $20 in the US. There are two popular models, Mellanox ConnectX-2 EN and Chelsio S310E-CR.

Switches are still expensive though. Even switches with only four 10G ports, and they may be noisy. Luckily you can grab two dual port Mellanox MNPH29D-XTR ConnectX-2 EN for around $150 and create your own “switch” easily with FreeBSD.

You need a motherboard with two or more PCIe slots(8x or 16x slot sizes). If you want a 6 port switch you need three PCIe slots, unless you get a network card like Chelsio T440-CR that has 4 ports.

FreeBSD 10.2-RELEASE ships with the Mellanox drivers, but they’re not ready to use immediately. You will need to compile and install the drivers first.

As root:

cd /usr/src/sys/modules/mlxen && make && make install && kldload mlxen

Now you are ready to create a network bridge that will act as a switch. First step is to list your device names:

ifconfig -l
mlxen0 mlxen1 mlxen2 mlxen3

Second step is to create the bridge adapter:

ifconfig bridge create

Add the ports to the bridge:

ifconfig bridge0 addm mlxen0 addm mlxen1 addm mlxen2 addm mlxen3

Make sure links are up/enabled:

ifconfig mlxen0 up
ifconifg mlxen1 up
ifconfig mlxen2 up
ifconfig mlxen3 up

Finally set the ip address for the bridge adapter:

ifconfig bridge0 inet 192.168.0.10/24

That is all. You now have a basic software based switch, connect your other systems, give them a proper ip-address and see them talk together just fine. However, wait! A bridge adapter should be much slower than a traditional switch? Yes, that is true, but for only 4-6 ports, it should not be that significant.

So I had to benchmark this, four servers with Ubuntu Linux, two of them as iperf servers connect to one dual port NIC (mlxen0 & mlxen1) and two as iperf clients connected to the other NIC (mlxen2 & mlxen3). I ran all of them at the same time and made sure all of the traffic had to go through the PCIe bus for five minutes.

The result was an average speed of 17GB/s, 8.5 GB/s each, with no tuning and the default MTU set to 1500. That should be plenty for everyone doing 10Gbps on small scale. If you need more performance, you have plenty of room left by spending endless nights of reading about network tuning in FreeBSD :-)